How to Write a Post
Latest update: July 5, 2022
This is a short description of how to commit a post to this blog. It will be updated as we find better methods or add new features. (Please feel free to make changes to this document and add your name above.)
You can of course use whatever method suits you best, but here is an example of using best practices from the command line to submit a new post (it is a bit overkill):
# Clone this repository
git clone https://github.com/compusciencing/compusciencing.github.io.git
cd compusciencing.github.io/

# Checkout a new branch to work on (standard git practice)
# - Replace <YOUR_POST_NAME> with something related to your post's title
git checkout -b post-<YOUR_POST_NAME>

# Create a new post (see resources below for editing Markdown)
# - Replace <DATE> with the current date in YYYY-MM-DD format
# - Replace <YOUR_POST_NAME> with the same value as the branch above
cp post-template.md _posts/<DATE>-<YOUR_POST_NAME>.md

# Edit the post using whatever text or code editor you prefer

# You might also want to add files in the assets directory
mkdir assets/<DATE>-<YOUR_POST_NAME>

# Optionally, add assets to the above directory

# Add post to repository and commit
# - Replace <DATE> with the current date in YYYY-MM-DD format
# - Replace <YOUR_POST_NAME> with the same value as above
# - Replace <YOUR_COMMIT_MESSAGE> with a brief description of your post
git add _posts/<DATE>-<YOUR_POST_NAME>.md
git add assets/<DATE>-<YOUR_POST_NAME>
git commit -m "<YOUR_COMMIT_MESSAGE>"

# Fork this repository on GitHub (or use https://hub.github.com/ or https://cli.github.com/)

# Add your remote and push your changes
# - Replace <YOUR_USER> with your GitHub username
# - Replace <YOUR_POST_NAME> with the same value as above
git remote add <YOUR_USER> https://github.com/<YOUR_USER>/compusciencing.github.io.git
git push <YOUR_USER> post-<YOUR_POST_NAME>

# Submit a pull request on GitHub (or use https://hub.github.com/ or https://cli.github.com/)
Here are links to the GitHub guide for forking and submitting a pull request.
For project proposals and reports, <YOUR_POST_NAME> should start with “Proposal:” or “Report:”, respectively.
You should be able to preview your post by pushing your added files to your forked repository and viewing on GitHub, or you can look at the resources section below for more information. In either case, though, you will probably not see the same styling as this blog.
Post template
I have added a simple template post in the root directory named post-template.md. You can use this or base your post off of another post.
You have a few key things to remember:
- You must include front matter at the top of your post. You should include at least the following fields:
layout,title,tags, andauthor. See some of the current posts for examples. - You must write your post in Markdown.
Review process
After you submit your post via a pull request, it will be reviewed and you might be asked to fix grammar or some of your text. This will be done using the GitHub pull request functionality (see also Committing changes to a pull request branch created from a fork).
Once the review process is complete, you should delete the git branch you created to make your post. You can delete your remote branch on GitHub by clicking the Delete branch button that appears on the pull request after it has been merged.
You can delete your local branch with the following:
git branch -d post-how-to-post
Updating your local repository
If you want to update your local repository (for example, to prepare to submit a new post), you should follow these steps, which assume that you used the process above to clone and fork the repository.
# Fetch the updated files from the compusciencing repository
git fetch origin

# Checkout your local master branch and merge the origin files
git checkout master
git merge origin/master

# Create a new branch (as described above) to create a new post
Resources
- Jekyll Documentation on Posts
- Markdown Documentation (Markdown is the preferred format for writing posts)
- Previewing Your Markdown Post (you can use any Markdown editor to view a version of your post locally before you submit; the styling will be different though)
Repository Structure
Below is a listing of the relevant files and directories for creating new posts. You can ignore all other files.
.
├── _posts
│ ├── ...
│ ├── 2018-10-24-starting-with-dart.md
│ └── ...
├── assets
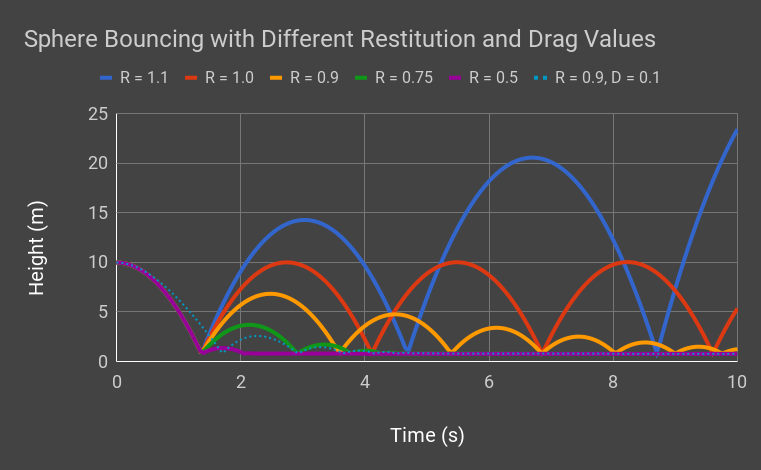
│ ├── 2018-10-24-starting-with-dart
│ │ └── sphere_chart.png
│ └── ...
├── ...
├── post-template.md
└── ...
To create a new post, you will add a Markdown file to the _posts directory, and any relevant files to a directory you create in assets. You can base your post on post-template.md.
As you can see above, your Markdown file name should use this format: YYYY-MM-DD-<your>-<post>-<name>.md. If your post is a proposal or report, it might look like this: 2020-09-07-proposal-how-to-do-cs.md.
Your directory in assets will use the same format, but without the .md extension.
Adding Images and Videos to Your Post
To add an asset/resource to your post (e.g., an image) you would first place the image in your assets directory (see the previous section), and then use Markdown syntax. Here is an example from Starting with DART (Dynamic Animation and Robotics Toolkit):
I encourage you to caption and/or cite your assets. If you do so, please use the following as an example from Report: OGP Weather Simulation:
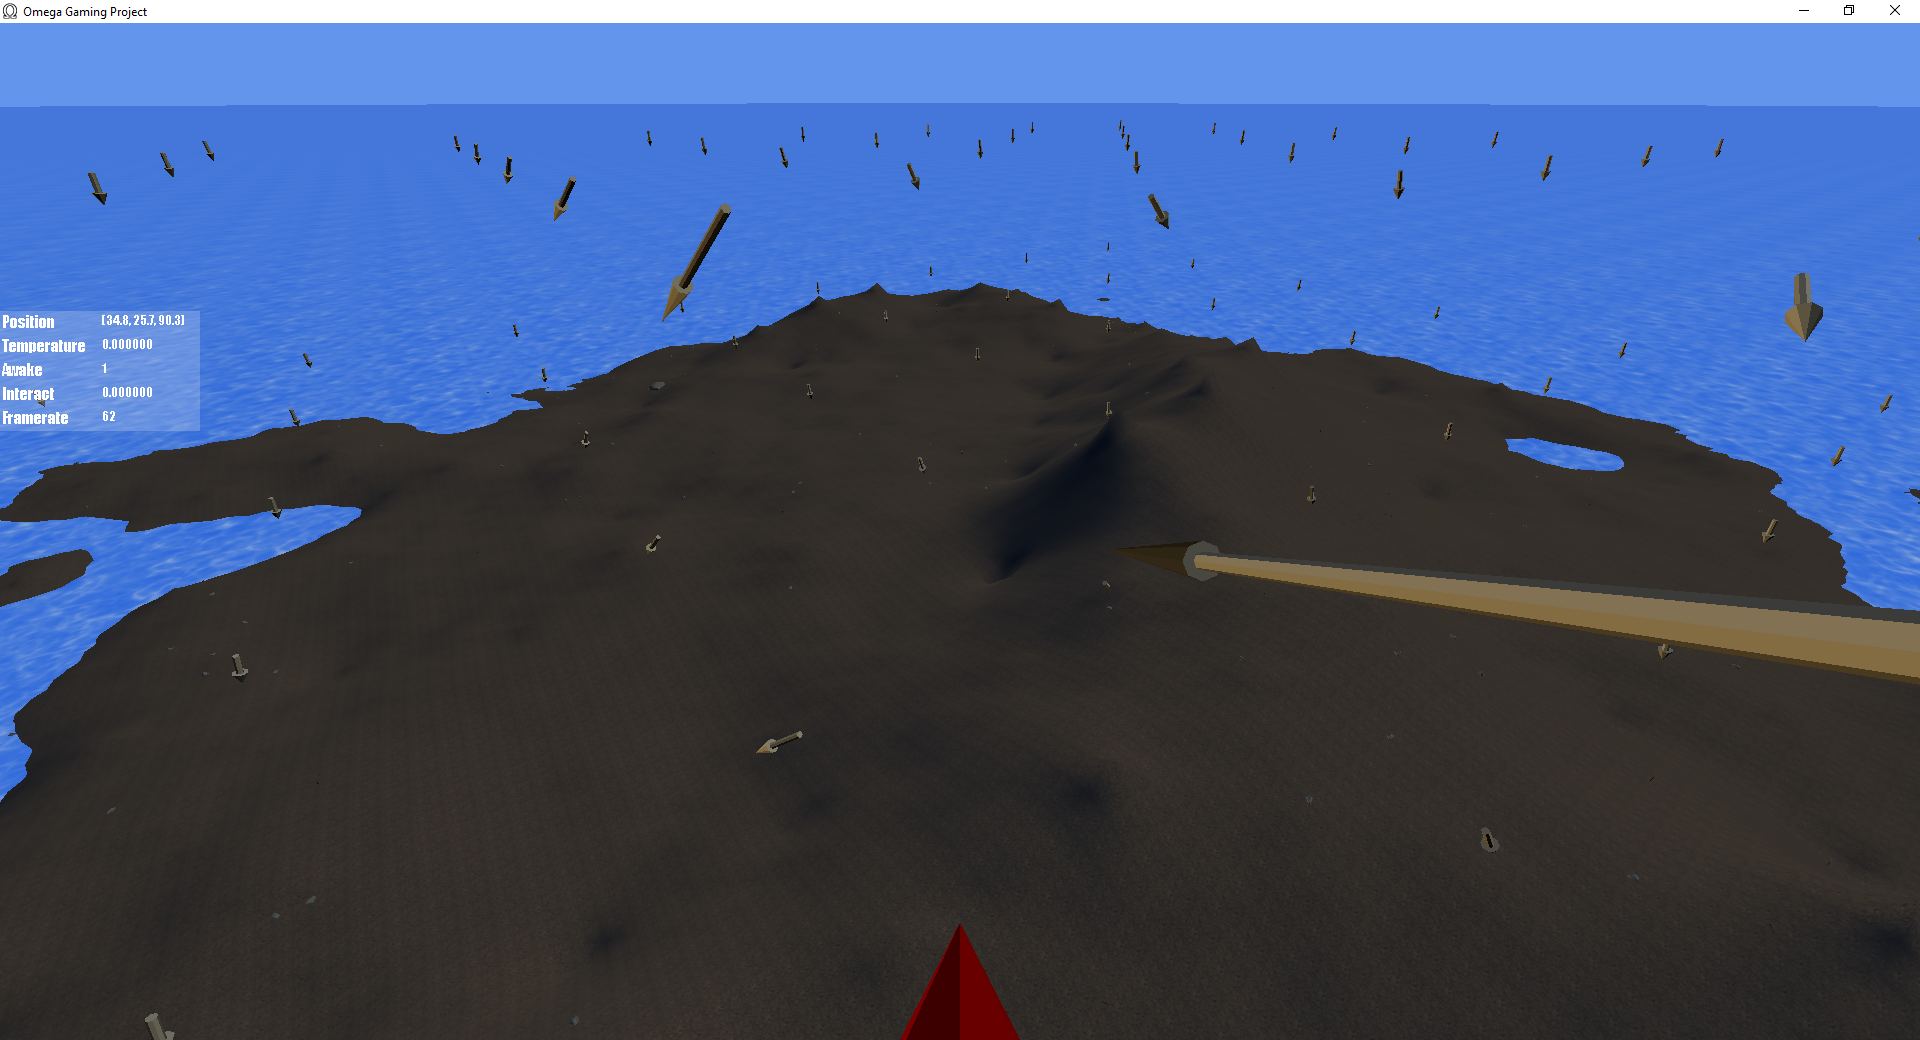
*Figure 6: Velocity field visualized in the 3D environment of OGP*
GitHub added support for including videos in markdown files as of May 2021..
One final note. It would be great if you would optimize your images before adding them to the repository. I use optipng and mozjpg (command line version) for PNG and JPG files, respectively. You can find similar tools for video, gifs, etc.